Thursday, June 19, 2014

bali: offerings at the markets

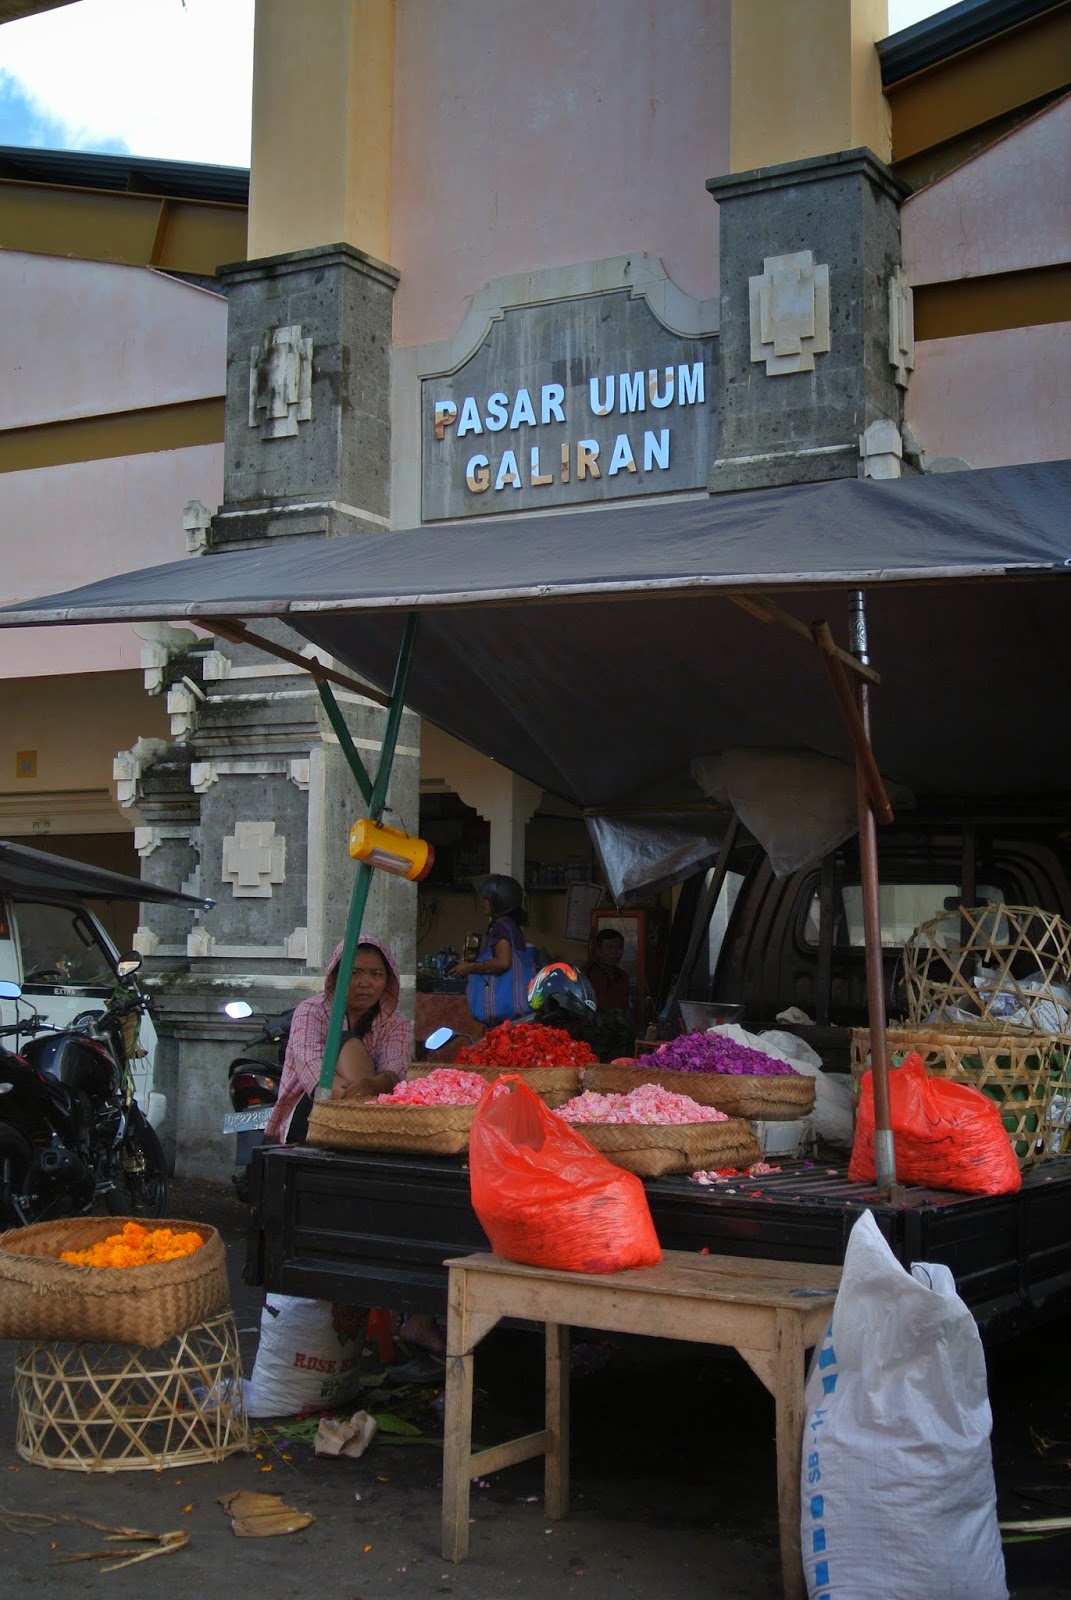
On every stall, and in front of many, were these Hindi offerings at the Klungkung markets. You could buy ready-made offerings or design your own with flowers grown on local farms.

The contrast between these beautifully decorated offerings and the grotty ground they sat on was captivating.


Miss May Blossom http://www.facebook.com/MissMayBlossom

Thursday, June 12, 2014

bali: cooking class

My husband's annual work conference took place in Bali this year and once again my Mum offered to mind our children while we jetted off overseas. I just made it within the 36-week ok-to-fly bracket (returning at 35 weeks and 5 days) and we managed to be home before the volcanic ash grounded flights. I'm not sure how I would have come home if we'd been stranded or if I'd have had to wait and have the baby in Bali!


We stayed in the luxurious Alila Manggis in Manggis. Thankfully it was over an hours drive from Kuta which was a very different scene. It really was such a treat to be there and after a few days of rest I decided to join in a cooking class which involved a visit to the market. As with a pricey resort I expected to pay a bit for the experience, though I wasn't expecting it to be quite so expensive.

I'll follow up with a post about the cooking class itself. 


First thing in the morning we travelled by car to the markets at Klungkung (a fairly big city just off the highway towards Denpasar). The markets just seemed to go on forever. It was a public holiday due to a festival and many of the stalls were closed but of the ones that were open you could buy anything from fresh fruit and vegetables (mostly local, some imported); to cooked foods; packets of biscuits and noodles; live produce (ducks, chooks, piglets); cooking equipment (I'm kicking my self for not buying a large, shallow mortar and pestle for $6AUD; and freshly made offerings from flowers grown on local farms.


There's no guessing how snake-skin fruit get their name. These look similar to lychees when peeled but have a 
more astringent taste and firmer texture.


Eggs cooked in herbs.


This was a little confronting. These ducks were in for a bumpy ride home. 
They were alive when I took this  but wouldn't have been for much longer.


Anyone for suckling pig?


Miss May Blossom http://www.facebook.com/MissMayBlossom

Sunday, June 8, 2014

bali: marta's family restaurant

For me, travel is so much about the food! I was really looking forward to getting out and exploring beyond the confines of our resort in Bali. Unfortunately I contracted a painful skin condition before we left Australia so it was a few days in to our trip before I could really relax and enjoy it. As it was, being 35 weeks pregnant, it probably was best that I rested!

Recently the government finished a highway that runs up the East Coast of the island and which has opened it up for tourism and for the ease of locals who work between the towns and cities. You risk certain death walking along the side of the road and the road rules are questionable (apparently you can overtake a police car with oncoming traffic) but it's not unlike other places we've travelled - I'm thinking of Thailand, Malaysia and Vietnam.

Just a few hundred metres walk (it's worth it if you arrive alive) from our resort in Manggis was this simple family restaurant. The meals were cooked to order and there was a range of Western dishes coupled with a good selection of local meals. You have to be prepared to wait for your meals but you can walk to the end of the street to the 'beach' while you wait or just relax!

I had to go back a second time for the gado-gado - which is one of my favourite Indonesian dishes. The peanut sauce was spicy and balanced and delicious and at the equivalent of $2.50AUD (Rp10 000 = $1AUD) it was also great value for money. This restaurant is family own and run and when the maître d isn't cooking and taking orders she travels to a nearby town for her second job. 


The suckling pig is a local delicacy. I wasn't too interested in trying it (could also be my very pregnant state) 
but Marta had this on her menu for the equivalent of $10AUD. 


You get the idea! Great food. Great value.

Marta's Family Restaurant
JL Pantai Buitan No. 1
Manggis Karangasem
Bali, Indonesia
08 5333 762 709


Miss May Blossom http://www.facebook.com/MissMayBlossom

Friday, June 6, 2014

black magic cherry cake (revisited and revised)

I am reposting this recipe. Yesterday I was rummaging through my pantry when I found a jer of black cherries. I bought them especially for this recipe but I hadn't got around to making it. It's been a year since I did make this cake so today was the day. It's rainy outside. I've bought a brand new box of tea and I'm envisaging sitting down in 45 mins to enjoy a slice and a cuppa.

I am also reposting this because I've tweaked it to be made in the Thermomix. I didn't have the Thermomix when I last made it. I've also included the original recipe for non-Thermomix users so you don't need one to make it!

Thermomix Recipe

ingredients

125g unsalted butter (cold, sliced)
300g brown sugar (loose)
240g SR flour
1 1/2 tsp ground cinnamon
1 tsp freshly grated nutmeg
410g can pitted black cherries, drained well

1 tspn baking powder
1 egg
300ml fresh cream
finely grated zest 1/2 lemon
1 tbls lemon juice

icing sugar and cream, to serve (optional)

method

Preheat the oven to 180ºc.

Grate cold unsalted butter (sliced) in the Thermomix bowl on sp 4/4 secs.
Add brown sugar, SR flour,cinnamon and nutmeg and combine on sp 9/20 secs until well combined and has the consistency (and look) of sand.

Place half the mixture in a greased and lined 22cm round cake tin. Shake, level and pat down lightly. Arrange the cherries over the mixture.

Add baking powder, egg, cream, zest, and lemon juice to the remaining mixture and combine sp 5/10-12 secs.

* tip: gradually and gently increase the speed from 1-5 so the mixture doesn't 'climb' the sides of the bowl.

Gently pour the cream mixture over the cherries.

* tip: once the bowl is empty spin the blades on sp 6 to loosen the batter from under the blades.

Bake for one hour or until a skewer comes out clean. Cool in tin for 15 minutes before turning out. Sift icing sugar over the top and serve warm with cream.


_____________________________________

This cake is a magic cake. I love the way you transform one half of the mixture from the same basic ingredients. The cake is crumbly and delicious, best eaten warm with cream.

ingredients
2 cups SR Flour
2 cups brown sugar (loose)
125g unsalted butter (cold)
1 1/2 tsp ground cinnamon
1 tsp freshly grated nutmeg

1 tspn baking powder
1 egg
300ml fresh cream
finely grated rind 1/2 lemon
1 tbls lemon juice
410g can pitted black cherries, drained well
icing sugar, to serve

method

Preheat the oven to 180ºc. 

Place sugar and flour in a large bowl. Grate the butter coarsely on top and stir through. Stir in cinnamon, nutmeg and mix well. Place half the mixture in a greased and lined 22cm round cake tin. Shake, level and pat down lightly. Arrange the cherries over the mixture.


Add baking powder to the remaining mixture and mix in well. In a separate bowl beat the egg, cream, lemon rind and lemon juice together. Add to the remaining mixture and combine well. Gently pour the cream mixture over the cherries.

Bake for one hour or until a skewer comes out clean. Cool in tin for 15 minutes before turning out. Sift icing sugar over the top and serve warm with cream.


Miss May Blossom http://www.facebook.com/MissMayBlossom

Thursday, June 5, 2014

feasting on the family farm

I've been meaning to get back to this post for months but I think it's time I released it in to the ether. This could be read as an ad for the Thermomix (I'm not a consultant) but if you're interested in the gadget it may give you an idea of it's versatility. I rarely use it for all-in-one meals (though I am trying out more of these) but I do use it in the preparation of meals every day. 

Spending the days preparing and cooking meals, with great ingredients, in an iron shed, in the middle of a paddock, is pretty much my idea of heaven. Meals are shared, eaten together outside at the table and at night - around the fire! 

This gives us a little taster of what it will be like when we hit the road in a caravan in 2015!


We’re fortunate to have a basic kitchen set-up on the family farm and it was put to good use this week during our holiday. I didn’t leave home without my Thermomix though.

I had a concise meal plan – with the intention of not having to go in to town, especially to buy any extra ingredients. As it turned out we did need a few extra things but I made sure that my organic produce delivery was timed to coincide with our departure of Sydney.

These are some of the meals we ate during our week away from civilisation...

It’s times like this that the Thermomix comes in to its own – as a versatile tool in the kitchen for the preparation and cooking of savoury and sweets.  As well as meals we need snacks and goodies for when visitors pop by. 

I hate waste - especially food waste (and we have to visit the tip to get rid of it) so everything we brought fresh was used. If there was bacon left over from breakfast it was thrown in a salad for lunch. You get the idea!

As well as the Thermomix we have a microwave that doubles as an oven and an electric frying pan.

Below are a few meals I used the Thermomix to prepare.

Breakfasts can be as simple (muesli) or complicated as we like down here, after all we have all day! A few mornings we ate bacon and eggs. Dippy eggs were prepared in the Thermomix (using this recipe) but you have to be careful not to overdo them! 12 minutes was too long.  You can also steam/poach the eggs, which we tried too. My husband is a fiend for Hollandaise and the recipe (from the EDC) is ready in 8 minutes in the Thermomix. We have a BBQ for bacon.

We used the remaining Hollandaise as a dressing for a Caesar salad for lunch.

Passata – One again - here is my roasted tomato passata recipe. Simply bake tomatoes (bruised and battered are fine) with an onion, garlic, fresh basil and chilli (optional) on 200ºc until the onions are soft and tomatoes are beginning to caramelise. Empty them in to a food processor or the Thermomix and whizz until they are a sauce consistency.  I use the passata on pizzas, fresh pasta and a base for lasagne, bolognaise and kidney bean nachos. It freezes well too.

Pizza Bases – I use the recipe from the Everyday Cookbook. You could use gluten-free flour if need be.


Flat Bread – I found this recipe on the recipe community and used it to mop up curry one night.

Pasta – one of the first meals we ate here on the farm was homemade fettuccine. Again, I used the recipe from the Everyday Cookbook. I brought down my pasta roller and rack. J and the kids collected a bucket full of nettle from the gully and some beautiful mushrooms so we ate the fettuccine with a nettle pesto and garlic butter mushrooms. There’s something so satisfying about preparing a meal with basic ingredients, from scratch. 


Lasagne – the béchamel sauce recipe from the Everyday Cookbook worked a treat. I cooked the filling in the frying pan and used ready-made organic lasagne sheets. You could also use thin slices of zucchini or eggplant instead of pasta. 

Green Curry – I was desperate for a spicy dish and the Thermomix makes preparing curry pastes easier than deciding on a jarred alternative in the supermarket (not to mention healthier). I modified a few recipes and came up with my own version (which I've since thrown out!.) I used this paste as one of my inspirations so give it a go if you want a green curry. It’s good and can be used with any meat (or tofu) and veggies. I serve it with brown rice (cooked in the Thermomix).

A shopping list

* As well as a healthy supply of fresh fruit (great for snacking) and veggies (the basics - garlic, onions, and veggies that are good for the week- carrots, potatoes, zucchinis, olives) we also packed the following:

* tins of  lentils, chickpeas and beans which are great for chucking in salads. Our kids also like bean nachos. 

* Quite a few cheeses - mozarella, cheddar, deli cheeses (for pre-dinner snacks), haloumi (for salads) and parmesan for pesto. 

* Nuts - pine nuts (for pesto) and others for snacking.

* Dried fruit for snacking. 

* Flours - pasta, plain and SR. I threw in cocoa (which came in handy when I needed to make a chocolate cake for visitors). If the weather turned I as also prepared to make play dough for the kids so I took food dyes. 

* Milk - not long life. We just travelled with tonnes of ice bricks and stocked up when we ran out. We do like a good coffee on the farm and good coffee means fresh milk. Next time I'll be making yoghurt there instead of buying it, too.


Miss May Blossom http://www.facebook.com/MissMayBlossom